Showing posts with label garage sale. Show all posts

Sunday, November 17, 2013

The Dresser My Fiance Hates--our Giant Blue Buffet


Today's project is one that spanned across 10 months and 2 states. My godmother had picked up this very solid buffet from a garage sale one weekend, and it sat in my garage while I worked on other projects. I was putting it off because it is quite a large piece of furniture and constituted quite an undertaking in my eyes! When I finally got around to it, I decided to paint it blue (Provence I believe?) with the intent of doing a sort of white wash over just the top of the buffet.

Here is the buffet in original condition. Very classic buffet style, but incredibly solid and well-made. Unfortunately, it had a varnish so thick that it was practically a mirror.


Partially sanded top, untouched and reflective bottom


For the top, I intended to strip it, sand it, then paint a white wash over the top that allowed some of the character of the wood to show through. I was somewhat discouraged by the thick varnish, so I got a bit over-zealous the power sander. After getting the worst of the reflective finish off the top, I started to notice how beautiful the wood was underneath that outdated shine. I decided I wanted to finish sanding the worst of the finish off and then leave the wood as is. Unfortunately, I got a little crazed with the power sander before noticing this and thus a bit sloppy. The sanding is uneven in some spots and is something I will probably go back and fix in the future, but for now I have a nice solid wooden top!


My next step was to slap on a few layers of paint. I believe the color is Provence. Visually, it was a huge, blue buffet and looked a bit flat to me when I had finished painting. I wanted to bring some visual interest to the piece, so I painted the decorative groove in the two hinged doors white. Holy crap that looked ugly! I immediately painted back over it with the blue and distressed to let it show through it a bit. Much better! Though it cost me a good while and a lot of elbow grease, I clear waxed the entire thing. At this point, we were approaching the Christmas season and the fiance and I moved to Texas. Much to his displeasure (I mean, this thing is soooo heavy and soooo blue), I insisted we bring it, unfinished as it was.

Looking very flat and boring, albeit blue

Oh yuck, not right at all

Just hanging with my girl! 

This big 'ole buffet sits in our bedroom now and the fiance uses it as a dresser. I think he has slowly come to like it, surprisingly. A few months ago I finally got around to finishing the distressing on it, though you couldn't tell from the photos unless they are close-ups. I decided to go rather light on it, nothing crazy, just the edges mostly.

This is becoming a thread in my posts, but again please excuse the lighting. Our apt is so small and dark I have no idea how to get better pictures! Just gotta throw open those windows and hope for the best :) That is the reason the buffet looks a few different shades of blue in different pictures. If you're curious exactly what Provence looks like, this link to Annie Sloan's website shows it pretty accurately in my opinion (the furniture piece to the right, not the paint swatch).

Here is the finished blue buffet!


I've nearly run out of projects to post about now! I have lots of things planned in my head, but our teeny tiny apartment and lack of power tools inhibits their creation a bit. Hopefully around January we will be moving to a larger place, maybe then we will have the space for more ambitious creations!

Wednesday, October 9, 2013

Branching Out: Using Milk Paint on our Bedroom Headboard


As evidenced by the extensive collection of chalk painted pieces crowding our apartment, I am a big fan of the Annie Sloan chalk paint. It is easy stuff to use and it has always turned out well for me! However, I was finding it hard to find a convenient supplier of chalk paint in Houston and having my mom ship me some from Tennessee was out of the question (that stuff is already crazy expensive before shipping costs!). I played around online and decided to try out Miss Mustard Seed's milk paint, since I could buy it online and have it shipped to me at a rather reasonable price, which is to say expensive but not so much as Annie Sloan. I'm thinking the chalk paint goes further, and I probably could have ordered it online and paid only a little more than for the milk paint, but I was curious to try out this "milk paint" and see what all the fuss was about.

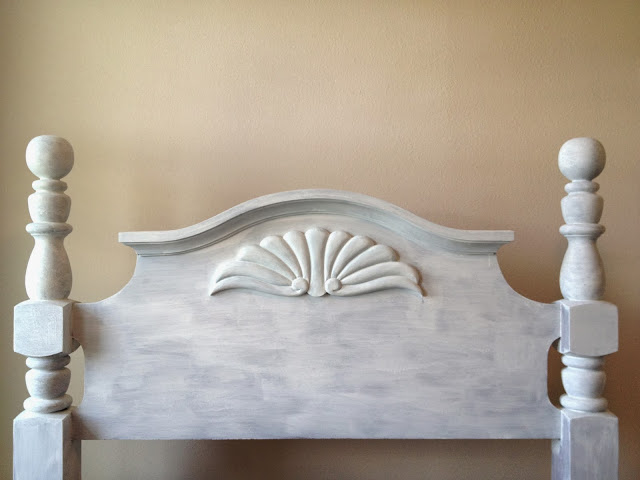
The headboard I chose to paint is a gorgeous and very solid, wood "antique" of sorts that belonged to my fiance's stepfather's father. I spotted it hanging out alone in a spare bedroom at his mother and stepfather's house, did a double take and thought "hello gorgeous." I would have loved to maintain the beautiful wood, I even would have sucked it up and stripped the whole thing just to re-stain this beauty, but the very top decorative molding is made from plastic. I didn't know how to get around this, so it became the perfect candidate for my next painting project!

Now for the milk paint: Miss Mustard Seed's milk paint came in dry form in a little pouch and requires that you mix it before use. I also ordered the MMS additive that will keep it from flaking off too much (I wanted a slightly cleaner look than what I was seeing on her website). I watched Miss Mustard Seed's online tutorials and how-to videos and felt well prepared, but damn that stuff did not want to mix!! I mixed and mixed and mixed and it was still watery with goop on the bottom. There was nothing else to do but either scrap it or lay it on, so I sucked it up and laid it on... ohmygosh it looked bad. Really bad. It was almost bubbly looking with little crystals in it and was very rough to the touch. I tried a different brush, I used less paint thinking maybe I was using too much, I tried using different strokes, I even sanded it once dry--all to no avail. In my usual style, I got frustrated that I couldn't figure out how to fix it and left it for about a week (okay, maybe two) until the fiance said finish the damn headboard or don't, but I'm moving the bed back! Whatever, Miss Mustard Seed practically says it will look like crap at first and then get better with more coats, so I mixed up the next coat (also goopy and displeasing) and slapped that on. Then I did another. And another. After three coats, I was out of paint and decently pleased with the outcome, so I scruffed it up a bit with some sandpaper once it had dried and declared it done. I would have waxed it if I had had any handy, but it has held up well the past 2 months or so and any distressing only adds character and authenticity to it, so I believe I am going to leave it. And now some pictures!


So there is the first coat above. Not so hot, right? And I forgot to mention that I did sneak a little chalk paint into this project ;) I painted the shell/flower motif so that it might subtly coordinate with our bright blue buffet that we use as a dresser in our bedroom (which I need to blog about!). Below you will see the whole headboard after one coat. Not too hideous for a first coat, no, but keep in mind that this whole headboard has the above-pictured texture (yikes).


Also, it would be negligent of me not to mention the dog hair stuck in every single layer. Broo had some needy moments while I was working on this project and as careful as I tried to be, a black dog and sticky white paint will be together no matter what. You can't stop it. So I embraced it and snapped a photo of my needy, shedding furchild "helping" me paint. Thankfully you really can't see the hairs unless you search for them!


Now for some pictures of the completed headboard!


You'll have to excuse the dreadfully wrinkled pillow cases. We're not fancy around here--if it's clean we roll with it. Someday it will be nice to be fancy; we'll paint the walls, maybe get a rug, find 4 matching pillowcases, buy curtains that fit our space instead of using leftovers from college (that now have flecks of white paint on them, oops). Until that time though, I can be happy with the hodgepodge set up we have ;)

After this experience using milk paint, I must confess I still remain a chalk paint girl. I'm not horribly disappointed or even displeased with the outcome, but it was a large pain in the arse and didn't save me any money either. I could see milk paint being advantageous if you are going for the chippy look that it lends itself to, but I myself am probably done with milk paint for a while!


Monday, August 12, 2013

Going backwards--my second Chalk Paint piece (plus some exciting news!)


Wow, so many months since my last real post! Our little apartment cramps my style more than a bit when it comes to hoarding furniture and working on projects bit by bit. There may or may not be flecks of paint on the walls, carpet and maaaaaybe curtains from my most recent project (but they are tiny flecks, promise!)  We even had to dismantle my green table and push it under the bed as soon as we moved in because there is no room for it! Shameful, I know.

Today I'm actually going to post pictures of my second ever chalk paint project---an Ethan Allen chair that I picked up at a garage sale for I believe $35. I kinda felt like the guy was ripping me off, since the chair was ugly, beat up and the cushions were disgusting. The foam was rotting away and the design was very outdated, but what drew me to the chair was how very solid it was. My mom kept telling me how good a brand Ethan Allen is, so I got the owner down to $35 and lugged it home. I had a little repair to do to the net-like wire-things that hold the seat cushion in place (excuse my sophisticated jargon there) which I expertly rigged with some thingamajigs from Home Depot, but once that was done I got to painting!


 This is the original state---beautiful wood but very very dark and dated looking. The color of the wood wasn't displeasing per se, but with the styling of the chair I didn't know how to update the look while leaving the wood. Enter the chalk paint!


I slapped on a couple layers of Duck Egg blue, distressed to my heart's content, and then wiped on a layer of clear wax. Now for the cushions---those were a potential problem, as I do not sew. Worse, the foam from the previous cushions had degraded to a point that it was gross and messy and not salvageable. I had picked up a bolt of fabric from another garage sale that I thought looked good with the Duck Egg blue, and when my godmother (and partner in crime) spotted the cloth draped over the old cushions, she offered to have them remade for me as my Christmas gift! It was a most generous offer for which I am so grateful, because without her I would have left that cloth tucked over the old cushions indefinitely :P  They turned out so well, and my godmother not only had the foam replaced but she also had her seamstress add piping to the edges, which looks quite fancy!

 Pictures really just don't do justice to these chalk paint colors, and since my apartment doesn't receive good light at any point of the day (and I can't drag these pieces 4 flights down and outside either) the photos are especially disappointing. Know that I am embarrassed for the quality of them but find no better alternatives. Hopefully you can still get a feel for the piece.


I'm also pretty thrilled with our new jute rug
The doberman pillow in this picture is one my mother made using a photo of our Broo! 


Judging by the amount of dog hair I find on this chair, this is what the stinker does when we're not home and have otherwise physically barred him from the couch. He does look preeeeetty cute in it though! :)


I have two more completed projects to share sometime soon, so look for those! I even branched out from chalk paint *gasp* so I'll show you how that went too.

One last thing---since my last post, the bf and I got ENGAGED! So now I have to call him fiancĂ© and wear this absolutely perfect ring  :D


<3


For a year I wore on my ring finger a simple silver knot the bf fiancĂ© had gotten me as a sign of his commitment. He always told me he wanted to wait to get engaged until he could buy me the ring I deserved--boy did he deliver on that!!


Sunday, October 21, 2012

The Super Secret Project!


In posts from a long while ago I alluded to a secret project I was working on, or rather I was more direct and stated unequivocally that I had a secret project, which was a birthday present for my bf. As you can see from my pictures I'm all about a shabby chic/distressed/worn-in and pre-loved aesthetic, which really isn't for everyone. The bf is on board because it is something I love and he is exceptionally accommodating of my brightly colored and high-personality pieces, but I know it isn't really his thing. While enduring couple-pinterest-time once (am I unbearable or what?) he mentioned that he really liked a spool table, which was just down his alley as it was dark, masculine, and wooden (which he loves) and most importantly, not chalk painted.
     I mentally took note of that comment and a couple weeks later ran across a horribly splintery and truthfully rather shitty spool at a garage sale. I didn't have much hope for it since it had some damage to the layer of wood on the top/bottom and was truly unbelievably splintery. It was only a buck tho so I took a chance (hah) and hauled it home. 

Original state--splinters splinters splinters

Original state---edges in terrible condition  
Routered edges, partially sanded


The first thing I did was router the edges to address the splintering and damaged areas. I routered every edge, top and bottom, and then got to work sanding the bejeesus out of the entire piece.
Routered edges
During the sanding process, I also used a wood filler to fill in the extra-damaged and splintery parts that would never smooth out, despite hours of power-sanding. The next step was to just go crazy with the power-sander and work my way from a 100 grit to a 220 until it was soft as butter. Unfortunately, I spent hours upon hours sanding it in the badly ventilated garage and got a sinus infection :/

Is this a classy work outfit or what?

Filled edges

One of the things I liked about this spool was the print on it, the same on both sides. It was worn beautifully, but to make this spool not only livable but safe I needed to do some drastic sanding. I was concerned that the print would be lost in the stain, so I experimented on the side I chose to be the bottom and filled in the top print with sharpie before staining. If you look at the photo below, you can see that the part I left unsharpied got totally lost in the stain, while the top logo showed through but didn't quite look natural as it had a bit of a sheen to it.

Bottom side, stained and with sharpie experiment on top logo

Darkened with sharpie, a bit too shiny to look natural

The wood was super dry and actually had some lovely grain, so the stain took wonderfully!

I wasn't super pleased with how the sharpie came out, so I decided to hand paint the side that was to be the top of the spool table. I mixed up a brownish black acrylic paint and got to work, and boy did it take a while! After painting it, I sanded the letters to make them appear aged and worn. I also added a little type to personalize my gift a bit, which you will see in a later photo.

Sanded to softness, but losing the signature printing!

Hand painted logo and type
The painted letters turned out better than the sharpied ones, although the original state was much more beautiful in that regard. My mom had a lot of cute ideas about personalizing my spool table, but I really had to reign myself in when it came to sassing it up. I wanted this to be a table the bf could be proud of in front of other men, perhaps even be something you could find in a (well-decorated) bachelor pad. That meant not writing cutsie things on it and not even thinking about touching chalk paint to the center between the table-tops....   labor of love, right?

I chose to simply put our initials on the top of the bottom, a little out of the way but still visible
Then the fun part started---polyurethane time. This is always my least favorite part of any wood project, and between the staining of the table and the top-coating I probably put this stage off for at least a month. I started this project months and months before his birthday, but by this time I had to rush to finish it! I had to polyurethane every surface of this dang spool, which took a good deal of patience to do all the multiple layers, but it turned out great and will no longer give anyone splinters! Just as importantly, the bf genuinely loved it and was very surprised. And he didn't say "oh this will look great on my porch!" which is how polite people say "I hate it this is not going in my house." Success.


Finished hand-painted type on the top surface

With good lighting, you can see much more depth and warmth in the wood. Unfortunately I don't have anywhere good to stage the spool table inside, so my photos are awkwardly outside and in natural light, which shows the wood to be rather darker than it really is. Nonetheless, enjoy!

Also, in some photos you might notice the places where I used wood filler. It hardened really nicely and sanded down perfectly, it even took the stain like a champ. The only reason it stands out is the lack of grain, which is a very predominant feature of the table. I'm okay with it though, it isn't really something you notice and the spool has a lot of "damage," like scratches and dents, which I think gives it character.

Finished


Hope you enjoyed my formerly super-secret project! If you're interested in checking out my pinterest, my user name is hannahleighes.

Have a fantastic week!


Wednesday, August 22, 2012

Iron Headboard in the Garden: update


Here are some more pictures of the vintage iron headboard I picked up at a garage sale a while back and planted in the garden. I would like to see it covered in the moonflower plant that has taken over the back patio, or perhaps entwined with the clematis that is gently choking out the little fountain nearby. There really isn't a good spot for the headboard in either of those locations though, so it will remain by the rosebushes!


Wednesday, August 15, 2012

A Facelift for the Bentwood Rocker Hiding in My Attic


Somehow through all my painting craze, the one in which I tried to get my blue and green paint-caked hands on anything and everything paintable, I managed to miss a large and hideous old bentwood rocker up in my attic. It has the classic swirly shape of this well-known rocker and that delectably ugly dark wood that just screams "paint me, paint me!!" So I called up my friend Claire, who has a great little place in East Nashville, and asked if she would have room for a rocker if I made it awesome. You see, I'm all about making sure my pieces have homes before I paint them, as a responsible painter and also because I'm apparently becoming the "crazy cat lady of tables" (psh I only have like 3). I'm also tiring of the jokes about how I should live in the basement studio because it is already fully furnished, minus a bed. Har har. Anyway, here's how the rocker turned out!

Here is the rocker in its original state (minus the caning on the seat which got a layer before I remembered to snap a shot)

I painted the caning a nice sage green wash and the body my favorite Duck Egg blue (both Annie Sloan). I also drank some wine throughout the project and wore my favorite shorts that my friends won't allow in public

After painting, which took a deceivingly loooong time, I decided that I really liked the colors together in theory but the effect in person was just so flat and frankly boring. It looked like it belonged in a nursery.

I clear/dark waxed the entire piece (which ohmygod took forever) and distressed it, but then the caning and body were too closely colored to contrast the way I needed them to

I went back over the caning lightly with a dark wood stain (idk if that is advisable or not, but it worked nicely for me!) and then wiped it off, bringing a lot of texture and visual interest to the piece. I also strategically wiped off dark wax. Feeling rather pleased with the current state!


I now declare it Finished (for now)!!


It took exponentially longer than I had anticipated to refashion this classic bentwood rocking chair, but it has turned out to be a neat piece and I think Claire really likes it. Job well done in my eyes!